His story along with his dedication to the joy and satisfaction of learning patternmaking skills has resonated with thousands of makers worldwide.
What started as a personal journey to create adaptive clothing for his body has grown into a creative outpouring of educational content about garment construction, fabric, sewing tools, and patternmaking skills.
And Cornelius is open about how his body has affected his craft. He’s not trying to cover up the fact that half of his body appears different than the other.
“I've realized I'm going to highlight it rather than try to disguise it for myself. That's what I found has worked for me because I can't change it, so I might as well embrace it. It becomes It's a part of the story of who I am. I like the fact that it's visually different...I’m not trying to disguise this. This is me, so I want asymmetry here.”
As a result of this approach to sewing, his content is just, so...Cornelius. There isn’t anyone else like him in the sewing world.
“Clothes are all about having our own flair, and so if we're making them, why not adjust to have them unique to our personalities? No pattern is going to be perfect just the way you want every time.”
He affectionately calls his subscribers on patreon “kernals on the cob,” and he honors their support with consistently inspiring and highly educational content, without any fluff or filler.
While Cornelius has plenty of short, entertaining videos that teach you invaluable lessons, but he also offers full patternmaking courses on his website here.
“I secretly try to get everyone to try a little bit of pattern drafting...It gives you a whole new freedom with the clothes that you make. If I can secretly encourage someone to try a little something, then I've succeeded.”
Cornelius recently joined us for the Seamwork Radio podcast and shared 5 tips for learning how to make your own patterns.
Below are his tips, followed by a full podcast transcript.
When you first start sewing or trying to make patterns, it can be challenging to visualize how to turn 2D pieces of fabric into a 3D garment. Cornelius aims to break this down as much as possible, so you can learn step by step.
“I once had this person teach me about how to learn, and they brought up the idea, break everything down into small enough steps, and it becomes understandable. In the same way, when it comes to pattern drafting, I like to think of it all as squares, circles, and triangles.”
He recognizes these basic shapes in all patterns, and it helps demystify the geometry in a way.
“For example, if we're drafting a shirt pattern, well, on the most basic of levels, it's a cylinder, but we open up that cylinder and it's a square. Well, then on the sides, we cut out two circles. Those become our arm holes. Now, we cut a triangle off the top. That gives us the slope of our shoulders. Then we can put in some darts.”
“A block in pattern drafting is the very basic templates that make up a shirt or a pant.
For example, a shirt block is the front panel and back panel of the shirt and then a sleeve. It doesn't have any collars or any of that on there. It's just those three basic shapes.
Building off the block essentially means that once we have drafted a basic block for ourselves, from there we can then create anything we want.”
Since Cornelius likes to break down patternmaking into small, approachable steps, he recognizes some little details that can really affect your success.
When you’re starting to work with patterns, always work with the stitch lines. On commercial patterns, seam allowance is included. So when you are altering pattern pieces or making adjustments, draw in the stitch line. That’s where you want all of your pattern pieces to meet.
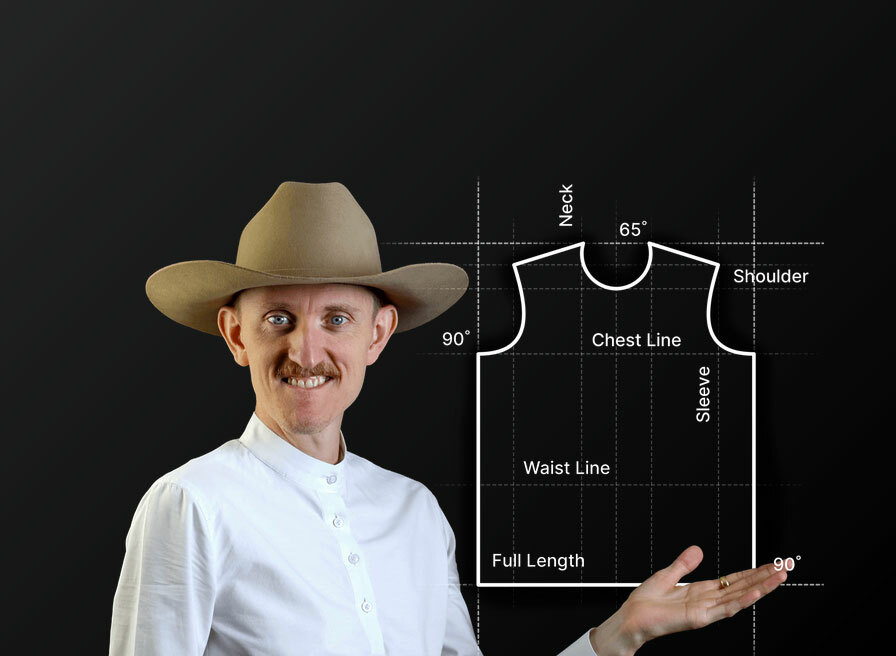
Another small detail that Cornelius emphasizes for patternmaking is the 90-degree rule.
“Essentially, what that means is that the corners of patterns should almost always be at a 90-degree angle. So that way, when they butt up against each other, there's a nice smooth transition from one to the other.
We essentially want them to be a perfect square. A simple example of this would be the bottom a hem on a shirt. They are perfect squares. They line up quite nicely and are easy to see.”
If you’ve ever sewn two pattern pieces together and ended up with a little point or curve where two edges meet, like on a curved hem, for example, those pattern pieces were not drafted with the 90-degree rule.
This simple detail will make your pieces all fit together nicely, creating smooth lines.
Piggybacking off of the 90-degree rule, this tip has to do with creating smooth lines when you can’t get that nice square.
“Well, the reality is that where two pattern pieces match up aren't always going to be perfect squares. It's just impossible for it to be squared out. In those sorts of instances, the idea is that whatever the angle of those two corners are that join up, they should total 180 degrees.”
While you might see the math and get intimidated, Cornelius emphasizes that the skill becomes second-nature with time. The ultimate goal is to get smooth lines.
“This is what I do when I'm drafting my patterns...I will cut them out and then butt the shoulders up against each other to then go ahead and smooth out the curve from the front of the neck to the back. So, that way I get that smooth transition. So when I put in my collar, it will again sit nicely and won't have any sort of a pucker.”
Cornelius loves to break patternmaking down into these basic concepts and small details. He emphasizes that when you make patterns, you’re simply working with basic shapes and creating smooth lines between all the pieces so that they fit your body.
“Once you get the basic shapes down, once you realize it's just the square circles and triangles, you start putting these pieces together.
At that point, it's then you start refining the details and making those little things, those adjustments, paying attention attention to those things is going to give you the little details in the fit that make it feel just right, that will be unique to your body and fit.”
Podcast Transcript
Sarai
Welcome back to Seamwork Radio, where we share practical ideas for building a creative process so you can sew with Intention and Joy.
Haley's out on parental leave with her new baby right now, so I've been hosting some really fun interviews with different creative makers here on the podcast.
Today, I have a really special guest. It's Cornelius Quiring, one of my favorite sewing teachers on social media right now.
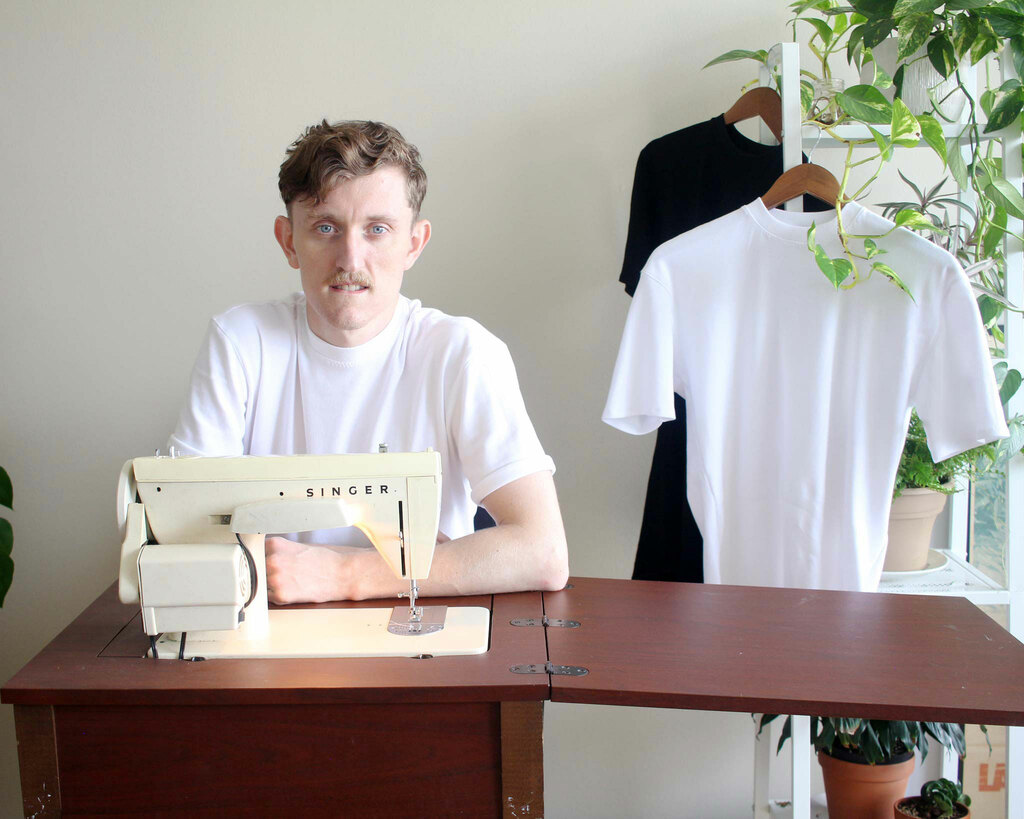
Cornelius has a really interesting story to share. After a childhood accident on his farm, Cornelius learned to sew to create adaptive clothing for his body. Now, he shares all the skills he has learned with tutorials, the inspirational content on Instagram, YouTube, and TikTok. He also has sewing classes and pattern-making courses available on his website, cornelius. Ooo.
If you haven't seen his sewing content yet, you are in for a treat. You're going to love Cornelius. And today, he's here to share five tips for drafting your own patterns.
Hi, Cornelius. Welcome to the podcast. We're so excited to have you.
Cornelius
Thank you so much for having me. I appreciate the opportunity.
Sarai
We're really excited to talk to you. I was saying right before we hit record that Sienna, our videographer on the team, is such a huge fan. I was so excited that we're going to be interviewing you today, but we're all fans on the team. We love your videos.
Cornelius
Well, Thank you. I feel like I could talk to her for hours. I have so many thoughts on filming content, but I'm glad to hear someone is noticing those details.
Sarai
Yeah, she would love that, actually.
Cornelius
Might have to do a second episode.
Sarai
Yeah, absolutely. We want to hear a little bit about you and your story. Can you tell our audience how you got started sewing?
Cornelius
Well, I've always liked making things. From a young age, I've been building go-karts, nailing wood together for various creations. My mom would sew quite a bit growing up.
As I got older, I started to have more of an interest in fashion and realized, well, I can make things. Why don't I also make my own clothes? And from there, I realized, why don't I make clothes uniquely tailored to fit my body? And so that's the very quick version of how that happened.
Sarai
Yeah. And how old were you when you first started?
Cornelius
I was in my teens. I did little bits and bobs here and there. But in high school, there was a sewing class. Me and my cousin decided we were going to try that out. That was my first, I'd say, real attempt at actually making things with a sewing machine. I made a pair of capri pants, big baggy ones that were fashionable at the time.
Sarai
I started sewing in high school, too. I wanted to make my prom dress originally, which my grandmother ended up making most of it, honestly. But she did teach me to sew in the process. I feel like that's very common at that age, that that's the age you pick it up.
Cornelius
A prom dress is an ambitious project. I admire that level of ambition.
Sarai
Yeah. Like a lot people, I didn't know what I was getting into at that point.
Cornelius
That's the key. Just get going, I find.
Sarai
Yeah, I think it is. I think there is some value in having an ambitious start and not really realizing that things are hard when you begin.
Cornelius
When something's well done, it seems easy, right? Yeah. You see a thing, I want to do that. I can make that, surely. Then you get into it and you realize, okay, there's this detail, and you get a step further, Okay, that other thing you know, you've got a whole craft on your hands.
Sarai
That's the exciting part about sewing is there's just so much to learn. It never ends.
Cornelius
Well, the way things are going, I assume I'm only going to continue to learn more. I feel like with every project, there's something I mess up, and then inevitably becomes a learning experience.
Sarai
Yeah, absolutely. Something you mess up, either technically or you learn something about what you actually want to wear versus what you felt like making, or you learned something about fabric. It's an endless learning opportunity.
Cornelius
Indeed.
Sarai
What is it that draws you to sewing? What made you stick with it over the years?
Cornelius
The reason I kept at it was I had an accident when I was very young, when I was three years old, and this big piece of farm equipment fell on top of me. As a result of that accident, on the right side of my body, there's certain muscle groups that didn't develop.
I found that clothes I would buy off the rack would never quite fit the way I wanted them to. They're always too loose on the right-hand side. In the process of making my own clothes, I realized, Well, hold on, I don't have to make symmetrical garments. I can make it however I desire. Now, every that I create only fits me. If someone puts it on, it's always too tight on the right-hand side.
But now that I've gone down this road and been able to figure it out, I can't go back. I tried buying them ready to wear clothes because I was like, “Oh, this is just too much work.” Making clothes, I don't have time for it.
But then inevitably, I despise them. Even just tailoring ready to wear clothes, they can be hacked to a certain degree, but when it comes to actually shifting sizes of armholes and things like that, it just isn't the same.
I've ruined myself for anything ready to wear, and now I'm in a... I like to say I'm in a jam where I can't stop. I have to keep going down this road.
Sarai
That's really interesting because I actually have a similar story in that I have scoliosis pretty badly, so I also have a lot of asymmetry in my body. For me, it's always been a conundrum how much of that is something that I try to disguise with clothing and how much is something where I tailor my clothing to fit my body the way it is. I think that's something I've come to terms with more and more over the years as I've gotten older.
Cornelius
I've realized I'm going to highlight it rather than try to disguise it for myself. That's what I found has worked for me because I can't change it, so I might as well embrace it. It becomes It's a part of the story of who I am. I like the fact that it's visually different. I once had someone in the comments of one of my videos mention, “Why don't you put a shoulder pad on one side so they balance out?” Which I found was an interesting response because I've so gotten used to the idea of like, “No, I'm not trying to disguise this. This is me, so I want asymmetry here.”
Sarai
Yeah. I think it's something that For different reasons and on different levels, a lot of people can identify with because I think everybody has their body things, their things that make them just a little bit different. I think sewing helps a lot of us to understand our bodies better and understand and comes to terms with those things that make us a little bit different.
Cornelius
If I'm being honest, in the beginning, I did try to disguise it. I had ideas of sewing pads into my arms and the chest on the right side to try to disguise it. I did start off in a place like that as well, myself, and then inevitably, as I grew as a person and embraced my experiences, The clothes that I made then ended up reflecting that as well to what I do now.
Sarai
It's interesting how what you make with sewing can reflect your mind state and how you relate to yourself and how you relate to the world around you. It's such an amazing craft.
What led you to create content around sewing? How did you get into that part of it?
Cornelius
I've always wanted to entertain. In fact, I wanted to be in a career of entertainment, but I never thought that I had the opportunity to do that. Between the leading figures in movies, magazine covers, I never saw myself as that, and I knew I could never be that. I felt an opportunity lost.
It just so happens that I've been born at the right time where social media and the internet exists. Again, I like to make things, so I thought, why don't I also just make my own content? I can be in control of that. I don't need to get approval to be in a movie, anything of that sort. I got to take this desire to entertain and broadcast that through social media.
Sarai
Yeah, it's an amazing time where you can really take control of your career that way and just make the things you want to make and put them out there into the world. There are people who want to see it. No matter why you're making, people want to see it.
Cornelius
It's interesting, especially sometimes the numbers don't even make sense because it ends up feeling so insular sometimes. I'm by myself in my basement filming these things, looking into a lens, and then editing it. So no one is touching any of this.
I hit post, and then people see it. Sometimes a lot of people see it. I don't know how to relate to that experience yet, because to me, it's still just me.
Sarai
Yeah. It is an odd situation where you're creating this on your own, but then if you were to close your eyes and visualize the people watching it, it's an auditorium full of people or a stadium full of people. There's so many people watching.
Cornelius
I don't know if you've had this experience at all, but if you've ever heard someone either listening to your podcast when you weren't aware of it or maybe in the wild or even just family members. My mom once watched one of my videos that I wasn't aware she was watching it, and it was a vastly different experience for me hearing myself as opposed to when I'm editing and controlling the process, which I found I didn't expect that to happen.
Sarai
In what way?
Cornelius
You know the way when you first start recording yourself and you watch it back, it feels very awkward and you're uncomfortable. Then over enough time, at least for me, as I've gone into the editing process, I'm almost gotten numb to it. Or not even numb, I just don't even think about it.
Then I had that experience again of hearing myself for the first time, which I didn't anticipate because I thought at this point I had a great understanding of what I sound like, what I look like. But that unexpected moment brought me right back to the beginning again.
Sarai
Do you think it was because your mom was watching it? Is that why that it felt so different?
Cornelius
It was the lack of control in that moment. I didn't set that up, because I've had a few other people in my life watch some of my stuff where I am within earshot, and every time I get that feeling again.
Sarai
Yeah. It's so vulnerable putting yourself out there like that.
Cornelius
Well, speaking of which, this podcast, I can very much control what my videos are. I can clip it down to a minute and a half, but I'm just speaking here without any control of what it ends up being. I'm feeling a bit of vulnerability again.
Sarai
Yeah, that's understandable. That's something that I really love about this podcast, though, is that it feels very much like a conversation, and it feels, I think to our listeners, too, it feels more intimate because it's not scripted and we're not setting anything up. We're just having a conversation. Well, we're setting things up a little bit, but we're having a conversation around it, which I think people really like.
Cornelius
I feel like it's an opportunity for me to grow, so I'm enjoying it.
Sarai
Yeah. You brought us some tips today all around building your own patterns. We're going to get into those tips now. You want to share those?
Cornelius
Yeah, by all means. I've got a list of five of them here. I'm used to being very visual, showing these things, so I'm going to try my best to explain them.
Number one, it's all squares, circles, and triangles.
Essentially, what that means to me is pattern drafting clothes It can seem very difficult, very complex, especially when you first start out. I know that's how I very much felt. As I've gotten into it more and more, I've almost been able to distill it down into simpler forms. I once had this person teach me about how to learn, and they brought up the idea, break everything down into small enough steps, and it becomes understandable. In the same way, when it comes to pattern drafting, I like to think of it all as squares, circles, and triangles.
For example, if we're drafting a shirt pattern, well, on the most basic of levels, it's a cylinder, but we open up that cylinder and it's a square. Well, then on the sides, we cut out two circles. Those become our arm holes. Now, we cut a triangle off the top. That gives us the slope of our shoulders. Then we can put in some darts.
Again, those are triangles. When I'm looking at patterns, I'm trying to find my basic shapes in all of them at all times and start off with these basic shapes and then add in more and more until eventually I end up at what is a shirt pattern, what is a pant pattern, coats, so on and so forth.
Sarai
I think that's so helpful because I think a lot of people have trouble visualizing how to take a two-dimensional object, a piece of fabric or a pattern, and make it into a three-dimensional shape. If you just think about what you just said about taking these and breaking it down into these very simple shapes and then putting them together to form a three-dimensional shape, it makes it a lot more easy, at least in my mind.
Cornelius
Anything in small enough steps is manageable, including the food we eat. That's how I like to break it down.
Sarai
Yeah, it's all doable.
Cornelius
Tip number two would be building off a block. A block in pattern drafting is the very basic templates that make up a shirt or a pant.
For example, a shirt block is the front panel and back panel of the shirt and then a sleeve. It doesn't have any collars or any of that on there. It's just those three basic shapes.
Building off the block essentially means that once we have drafted a basic block for ourselves, from there we can then create anything we want.
For example, with that shirt block idea, again, if we want to turn that into a T-shirt, well, we simply just add a rib knit collar on there. We can cut the sleeve shorter if we want. Maybe we can bring the hole. We can cut the block open by midway through the shoulders, widen it out, and we have a wider fit drop cap sleeve top.
If we want to get a little bit more complex, we can then turn that into a button up. We just take the front piece, we cut it in half, we add a placket. Up top, we then add our collars. Then with the shirt sleeve, we just trim them a little bit shorter, add a cuff around there. Then again, we add a little placket.
It's that idea of once you've got this basic template, you can just evolve this shape into just about any type of garment that you want to wear. In a way, now that I think about it, it's almost lesson two of lesson number one, which is building on steps, taking simple concepts, making them more and more complex.
Sarai
Yeah. What I like about that, too, is that you can then take, if you build something from a block, let's say the button-up shirt pattern that you just mentioned, and you want to make an adjustment to that, then you can use that button-up shirt as a block as well and add more details in the future.
Cornelius
Exactly. That's what I do with high-waisted pants. I have my block, then I made my regular pant pattern. Then with the high-waisted ones, it's just a case of raising the waist and adding in some pleats in the front. Voila, I have a fabulous vintage style pant.
Sarai
Yeah, it's the possibilities are really endless once you learn how to make those adjustments.
Cornelius
All right, then, tip number three is measure on the stitch line.
This was a mistake that I was making earlier on and is what sometimes causes pattern pieces not to line up. Often with commercial patterns, the seam allowance is built into to the pattern itself. So typically in North America, at least, it's about five eighths of an inch.
But what that means is what actually ends up being the garment is in five eighths of an inch from the outside of the pattern that has been cut out. An area where this really comes into play is sleeves, for example.
So we have this arch-shaped curve. After we've sewn the shoulders together, we get this arch shape. And if we go ahead and measure that on the outside, that line ends up being smaller than if we draw in the five eighths of an inch and go ahead and measure that, because that actually ends up being the length of where the sleeve connects to the arm hole.
And then the same thing goes on the sleeve pattern. We don't want to measure the actual outside of the pattern itself at the top by the sleeve cap. Instead, we want to bring it in our seam allowance amount, measure that, and then making sure those two line up to make sure they perfectly match each other as opposed to the edge of the pattern if it has a seam allowance baked into it.
Sarai
Yeah, that's definitely a mistake I made early on in my sewing career is not understanding how to adjust based on where the actual seam line is versus where the edge of the pattern is.
Cornelius
It's these little details that I feel like can trip us up and are the learning lessons.
Sarai
Yeah. A lot of people today, they don't have somebody in person to teach them these things. Sometimes a lot of us learn by trial and error.
Cornelius
The amount of mistakes I have made. I've come to embrace this process of making mistakes because it seems to be the way that I learn lessons best.
Sarai
Yeah. That's a common refrain I hear in talking to anybody in the sewing community is, The mistakes I've made have been the biggest teachers in learning this craft.
Cornelius
It seems like the mistakes never end. I'm continuing to make all sorts, so I hope to continue learning for a long time.
Sarai
Yeah.
Cornelius
Tip number 4. This one, I've cut out some pattern pieces here for myself. If you hear some paper rustling, that's what that is. But I've done it so I can best understand it while I'm describing it here.
And so tip number 4 is the 90-degree rule. Essentially, what that means is that the corners of patterns should almost always be at a 90-degree angle. So that way, when they butt up against each other, there's a nice smooth transition from one to the other.
We essentially want them to be a perfect square. A simple example of this would be the bottom a hem on a shirt. They are perfect squares. They line up quite nicely and are easy to see.
However, moving up the side of a shirt along the side seam up to the bottom of the armhole. By that armhole, this same rule applies again. We want the curve from the front pattern piece to go perfectly out to a 90-degree angle, and then the back pattern piece at the bottom of the sleeve hole, again, it's a 90-degree angle. It doesn't have to be for a very long distance, but just enough so that when the two pattern pieces are sewn together, the seam allowance and then a little bit further are at a 90-degree angle.
The reason why this matters is it creates a nice smooth curve from the front of the armhole on the front pattern piece around to the back.
Otherwise, we end up getting points or reverse points, which when we then sew on the sleeve, it's going to create some odd puckers underneath.
This is a little bit of what I would call a finer point detail, but it's certainly important, I find, to refine one's pattern drafting skills. Does that make any sense?
Sarai
Absolutely. When you're drafting a pattern, You would square up those corners where things meet, is what you're saying?
Cornelius
Yeah. The idea is for them to be 90-degree angles, because a 90-degree is a perfect square. You join them together and it becomes 180 degrees, which is a perfect line. When it's a curve, for example, it's just a very short amount. It might even just be a quarter of an inch on each side where it is a perfect 90, and then it swoops up again. But that's enough to help create that smooth transition for just refining the details.
Sarai
Yeah, I've definitely made that mistake on curved hems, for example, of wanting to have a curved hem, and then you end up with this weird divot right where it meets with the side seam. You have to create that straight line just at that spot.
Cornelius
For me, it was waistbands where the pant patterns join up in the center back. There'd be weird points happening, and then the waistband wouldn't sit nice and flat. Then randomly in a YouTube tutorial, I was watching, the person mention it about a different thing, and I was like, “Oh, that explains it.” And ever since then. It just stuck in my memory immediately because it just made so much sense in that moment.
Sarai
Yeah.
Cornelius
And use it all the time now.
Sarai
One of a thousand sewing epiphanies.
Cornelius
They really never end.
The fifth and final one piggybacks off that other one, which is the 180-degree rule. Essentially, the idea with the previous one was that we get a nice line from one to the other.
Well, the reality is that where two pattern pieces match up aren't always going to be perfect squares. It's just impossible for it to be squared out. In those sorts of instances, the idea is that whatever the angle of those two corners are that join up, they should total 180 degrees.
Continuing with the shirt example that I had with the neck hole. With the front pattern piece, the neck hole ends up being mostly on the front pattern piece. And so as we go up the curve towards the shoulder, where that line ends up and then it slants back down again on the shoulder, that is definitely less than a 90-degree angle.
So what we do with the back pattern piece is we compensate for that angle and do the remainder amount on the back piece. I'm holding my back pattern piece upside down here and joining the two shoulders together. So, as the curve from the front neck hole piece goes over to the back, I want it to transition nice and smoothly over to the back and continue and around to the back of the neck.
Cornelius
This is what I do when I'm drafting my patterns as well. I will cut them out and then butt the shoulders up against each other to then go ahead and smooth out the curve from the front of the neck to the back. So that way I get that smooth transition. So when I put in my collar, it will again sit nicely and won't have any sort of a pucker.
Sarai
Yeah. So to put it in other words, you're saying that if you have two pieces meeting that can't be at 90 degrees, you still want them to add up to 180 degrees, so you have a straight line.
Cornelius
Correct. Yes. So 110 and 70, for example, or 120 and 60. Whether you decide to actually measure them, that's another way of doing it.
If you have a... Is it a protractor? I forget. What was it called in high school? Yeah, I think so. You can use a protractor to measure the two. Or the way I do it, I like to just butt them up against each other and then draw that line. But in the end, the math ends up being 180 degrees.
Sarai
That's a great tip. I love that. Basically, what we're trying to convey to people is that I think with the last three tips, it's all about creating those smooth transitions and those smooth seam lines when you're drafting a pattern, don't you think?
Cornelius
Yeah, it's a It's little details because once you get the basic shapes down, once you realize it's just the square circles and triangles, you start putting these pieces together.
At that point, it's then you start refining the details and making those little things, those adjustments, paying attention attention to those things is going to give you the little details in the fit that make it feel just right, that will be unique to your body and fit, just slightly tweaking the shoulder slope. It just sits a little bit more to your body and those sorts of things. That's where these details are going to come in and be handy.
Sarai
It's something that you can learn over time. I think the more you do it, the more you play around with patterns and try to make these adjustments, the more you'll learn, either through trial and error or just finding those little details, like you're saying, that really make it feel right to you.
Cornelius
Many of these things I didn't know for years. They are definitely things that as you get into it more and more, you're going to start paying attention to. In the beginning, it's about just trying to figure out the fit. But as you go on, you can start noticing these things, and they'll make a difference in your craft and take you from, as one of my professors used to say, from silver to gold.
Sarai
I love that.
Do you think for the average sewer, for somebody who is making clothing as a hobby, they just want to make things that they enjoy making and that fit their bodies and that they'll actually wear. Do you think that learning to do some basic pattern drafting like this is something that everyone should pursue or everyone should try?
Cornelius
Absolutely. I have this theory that if you know your tools, you can do a better job of whatever it is you're making or doing. I like to look at patterns as a tool.
When you learn how these shapes and changes change the fit of the garment itself, it's going to radically alter your understanding of the clothes that you're making.
Even if you don't necessarily get into it right away, there's a certain amount of learning that needs to be required on just how to assemble a garment. But then as you get into that, you're going to start noticing, Well, I find that my sleeves are always a little short or they're a little too tight or a little too loose. You start getting into this place of like, What if I just slim them down a little bit?
Then that's where you then get into, Okay, well, now I have to adjust my armhole. Wait, I made my arm hole smaller, but then now I need a smaller sleeve to fit. In that example, you've got two radically different curves that you now have to change to fit. It seems simple enough. I just want to slim down my sleeves a little, but you're now having to create a squiggly curve and an arch curve, and those have to match.
You're going to find yourself going down this rabbit hole of altering your pieces. And so understanding these things, knowing these skillsets, is going to take your garments from silver to gold.
Sarai
Yeah. I think also for modifying patterns that you use, just to make them more your style, just to add the details that you like, that you personally enjoy, or going from an inspiration that you see on Pinterest or on social media and using a pattern to create that. It's something you can do if you learn just a little bit of pattern drafting.
Cornelius
Clothes are all about having our own flair, and so if we're making them, why not adjust to have them unique to our personalities? No pattern is going to be perfect just the way you want every time. That's a good point as well.
Sarai
Yeah, definitely. Well, thank you so much. These tips are wonderful, and I think they'll help people. I think they'll encourage people to give pattern drafting a try because you've made it so simple.
I think this idea of just thinking about these very simple shapes and then refining with these details is a helpful way of framing it.
Cornelius
Well, thank you very much. I do appreciate the opportunity opportunity to share them. I secretly try to get everyone to try a little bit of pattern drafting. I find it so enabling, if that's the right word.
It gives you a whole new freedom with the clothes that you make. If I can secretly encourage someone to try a little something, then I've succeeded.
Sarai
That's awesome. Well, where can people find you, Cornelius?
Cornelius
I'm on all the major platforms. If you've looked for me on Instagram, TikTok, YouTube, That's where I tend to post content. Or you can find me on my website, and all the links are there, which is just Cornelius.ooo, and you'll find everything I've got going on right over there.
Sarai
Great. Anything in particular you want to promote?
Cornelius
Yeah, pattern drafting. Try it out. It's really worth it. It seems difficult, but it's worth it. If you feel like it, why not have a watch of some of the content that I put out there? Might be a few things that you can pick up here and there.
Sarai
Yeah, absolutely. Well, thank you so much.
Cornelius
And thank you for the time.
Sarai
I want to thank Cornelius for coming on the podcast today. It was such a pleasure to talk to him. I'm a huge fan of everything he does, especially his YouTube videos.
If you haven't checked out Cornelius yet, be sure to do that. He just breaks down everything and makes it really, really super simple and easy to understand. If you're interested in pattern drafting, Cornelius is going to help you out.
We also have a lot of help on our community. We just have some of the nicest, most helpful sewists that you can imagine over at Seamwork. Our team, along with thousands of Seamworkers, are here to talk to you and cheer you on. You can ask any question about sewing with absolutely no judgment in our community, and you'll get some amazing answers.
You can also share your finished projects, and you can create goals. We'll even email you reminders to keep you on track. It's It's a perfect place to go if you need a quick boost of creative energy.

 Sign In